Tuesday, November 12, 2013

Cookies 'n' Cream Cookies

I think that making anything cookies and cream flavor, would be delicious.  Think about it... cookies and cream ice cream... amazing!! Cookies and cream fudge... um yeah!! Cookies and cream brownies... more please!! I'm really thinking we need more cookies and cream.  Just think.... cookies and cream hot chocolate? Cookies and cream pie? Cookies and cream cake? I'm drooling just thinking of the possibilities. 

You better add this recipe to your cookie swap.  It's amazing.  I mean... crushed up Oreos within a cookie? What could be better?!  I thought of this recipe when I was thinking about my two favorite desserts to make. Oreo Balls and Chocolate Chip Cookies... I thought... "Why not combine them?" And I'm so glad I did. These cookies are so delicious and different! Definitely a crowd pleaser.  


Cookies 'n' Cream Cookies
Makes: 4 Dozen

Ingredients:
1 cup butter, softened
1/2 cup brown sugar
1/2 cup granulated sugar
2 eggs
1 teaspoon vanilla
1 pkg (4.2 oz) Cookies and Cream pudding mix (you could also use white chocolate pudding mix)
1 teaspoon baking soda
2 1/4 cups all-purpose flour
1/4 teaspoon salt
16 Oreo cookies, roughly chopped or crushed
1 cup white chocolate chips (you could sub a 5 oz Hershey's Cookies 'n' Creme chocolate bar, roughly chopped... and that would be amazing as well.)

Directions:
Heat oven to 350F.
In a large bowl, cream together the butter and both sugars until light and fluffy. Add the pudding mix and blend. Add in the eggs and mix until completely combined. Add in the vanilla.
In another bowl, combine the baking soda, flour and salt. Gradually add into the creamed mixture and mix until combined. Fold in the Oreos and white chocolate chips or Cookies 'n' Creme bar.
Form dough into tablespoon sized balls and place 2 inches apart on a lightly greased baking sheet. Bake in the oven for 8-12 minutes, or until golden on top.

Sunday, September 29, 2013

Grilled Chicken Curry Risotto

Sometimes I come up with things in my head that are amazing. And other times I think... "why would I even think of putting those ingredients together"?  I was a little skeptical of this dish because normally when I mix Italian and Thai foods, it's a disaster.  This however, was not a disaster.  I'm always amazed when I think, "wow, I'd totally make this again... in fact... I WANT to make this again!"  That's what I thought for this meal.  It's delicious and it actually works together! I can't wait to make this again.  Enjoy!


Grilled Chicken Curry Risotto
Serves: 4

Ingredients:
Chicken:
1 1lb package or chicken tenders or 4 chicken breasts
poultry seasoning
1/2 cup coconut milk
1 tsp red curry paste
1 Tbsp. soy sauce

Risotto:
1 cup arborio rice
4 cups vegetable or chicken stock
1 cup coconut milk
1/2 cup white wine
1 Tbsp red curry paste
2 cloves garlic, minced
1 Tbsp olive or grapeseed oil
1/2 red pepper, chopped
1/2 onion, chopped
1 carrot, sliced into matchsticks
1 cup chopped broccoli
salt and pepper to taste

Directions:
For the Chicken:
In a glass container, mix the coconut milk, curry paste, soy sauce and seasoning.  Add the chicken and coat.  Let sit in marinade for an hour. Remove from marinade and grill until chicken is completely cooked. 

For the Risotto:
In a medium sized sauce pot, bring veggie or chicken stock to a boil, then turn down to a simmer to keep warm.

In a large saucepan, heat a drizzle of oil over medium heat and add garlic and curry paste.  Stir and cook about 2 minutes.  Add the rice and stir to coat with oil.  Saute until it turns a golden brown, about 2 minutes. Add white wine and stir.  Add coconut milk and stir until absorbed  Add 1/2 cup of the broth and stir continuously until it absorbs.  Repeat this step until the rice is plump, but still has a bite.  You don't want it to be mush. 

Meanwhile, heat the grill to a medium heat.  Place the veggies in a grill pan and grill until soft. 

Mix the veggies into the risotto and add salt and pepper to taste.  Plate risotto and serve chicken over the top. 

Tuesday, September 24, 2013

Autumn Turkey Burgers

I'm new at this burger making thing.  I never made them before we got our grill.  I feel like I want to make them at least once a week now.  There are so many different delicious things you can add to a burger to make them even more delicious.  The past few times I made burgers, they had about 30 ingredients in them.  They all turned out okay, but these... these burgers were amazing... and totally blog worthy.  We had a friend over when I made them (which is strange because I don't normally make new things for company... ha) and afterwards he told me that I needed to open up a restaurant.  That's always awesome to hear. 

Anyway, once again... I create a fall version of something amazing already.  The turkey burger.  These were probably in my top 3 burgers I've ever had... I'm not a huge burger eater anymore, but I've been to some awesome places for burgers.  The top place for a burger is in Jerome, AZ.  Uh... I always called it Ghost Burger, but I just Googled it and apparently it's called the Haunted Hamburger... anyway, whatever it's called, it's awesome.  The views, the city, the burger... it's a pretty unique experience.  

Back to my burger.  It's delicious and very easy to make.  Goes very well with sweet potato fries too! Enjoy!


Autumn Turkey Burgers
Serves: 4-6 (6 small patties, 4 larger patties)

Ingredients:
Burgers: 
1 1/4 lb ground turkey breast
1/2 cup chunky apple sauce (I didn't have apple sauce so I just cut an apple into chunks and boiled it in about an inch of water for 30 minutes until soft and mashed it)
1 tsp poultry seasoning or whatever you have
1/2 cup cooked wild rice
2 Tbsp pure maple syrup
1 Tbsp mustard
1/2 tsp garlic powder
1/2 tsp salt
1/4 tsp pepper
hamburger buns (we used ciabatta rolls)
Toppings such as lettuce, spinach, tomato, onion

Maple Dijon Mustard:
1/4 cup mayonnaise
1 tablespoon Dijon mustard
2 tablespoons real maple syrup

Directions:
In a large mixing bowl, add all ingredients except turkey, buns and toppings.  Mix well and add the turkey.  Mix to incorporate, but do not over mix.  Form into patties and grill on a hot oiled grill for about 5-6 minutes per side.  

Serve on buns with a dollop of Maple Dijon Mustard and favorite toppings. 


Pumpkin Oreo Truffles

Tis the season, where I add pumpkin or apple to literally everything I make. I love it!

These truffles (normally called balls, but I'm trying to be all professional here) are heroic.  My normal Oreo Truffles are raved about wherever I take them.  I went to a picnic this summer and brought a double batch (that's over 100 truffles) and they were literally gone in less than 5 minutes.  Not joking at all. They are amazing and if you need to make friends, make these. 

Anyway, I wanted to fall up my Oreo Truffles and I thought, why not make them pumpkiny?  So I used the Golden Oreos and added pumpkin and spices.  These seriously taste like fall exploded into your mouth.  They are pretty amazing and a nice little snack to take to your autumn pot lucks.  I feel like they have gotten better since sitting in the fridge for a day.  The spices have really come alive and you can really taste the pumpkin.  I'm excited to share these... but for now, the whole batch sits in my fridge all for me!  Oh yay! Enjoy!


Fall Oreo Truffles
Serves: 25 (if you limit yourself to 2... which you won't)

Ingredients:
1 package of Golden Oreos
4 oz cream cheese
1/2 cup canned pumpkin
1 tsp cinnamon, plus more for sprinkeling
1/2 tsp nutmeg
1/4 tsp cloves
6 squares of white chocolate candy coating

Directions:
In a good blender, blend up the Oreos until fine. Do not over blend, mine took about 5 seconds. 

In a large mixing bowl, cream together cream cheese and pumpkin.  Add spices and stir.  Stir in the cookie crumbles and mix until the dough can form a ball.  Place in a sealed container and freeze for an hour up to overnight.

Roll the mixture into balls.  Melt the chocolate in a double boiler or in the microwave in 30 second increments. Dip the balls into the chocolate and place on parchment paper to harden.  Sprinkle with cinnamon before completely hardened.  Enjoy!  Store leftovers in fridge. 

Sunday, September 15, 2013

Gluten Free Pumpkin Dump Cake

When I was little, Dump Cakes always made me giggle.  To be honest, they still do.

My mom made a dump cake when she was pregnant with me and went to deliver it to the new neighbors.  She tripped over a cord in the garage and dumped the dump cake all over the driveway.  That's how I thought the name was invented.  I really thought I was part of the beginning of dump cakes.

It's finally cooler in the evenings now and I've been in the mood for fall weather and food since June.  I love fall so much.  It's cool and delicious.  And all of the October beers come out and they are amazing as well.  

I decided to start my fall cooking adventures out with this pumpkin dump cake.  Made it gluten free too by using a gluten free cake mix.  I used Hodgson Mill which, unless you Dr. it up, tastes like corn bread.  You can use your favorite gluten or gluten free cake mix though.  If you go with Hodgson Mill add some sugar and vanilla to the recipe to make it sweeter. Or add sweetened coconut milk.  The recipe is pretty sweet though so you might be good.  

This was delicious.  A perfect start to fall!  Not too pumpkiny, and you couldn't even really tell it was from a can.  My dump cake was really runny (sorry, I still think dump cakes are humorous) because I replaced the eggs with apple sauce... at least that's why I think it was so runny.  But runny or not, the taste is super good! Enjoy!


Gluten Free Pumpkin Dump Cake
Serves: 10-12

Ingredients:
1 15oz can organic pumpkin (or you can use 1 3/4 cup pureed pumpkin)
1 1/4 cup canned coconut milk
1/2 cup light brown sugar
1/4 cup pure maple syrup
3 eggs, beaten (I used 1 3/4 cup of applesauce mixed with 2 tsp of baking powder as egg replacement... apples are fall too so it just added to the awesomeness)
1/4 tsp nutmeg
1/4 tsp cloves
1/2 tsp cinnamon
1 box gluten free yellow cake mix
2 sticks butter, melted (I used 1 stick and 1/2 cup coconut oil)
1 cup coarsely chopped pecans

Directions:
Preheat oven to 350

Spray a 9x13 baking pan lightly with cooking spray

In a large mixing bowl, combine the pumpkin, coconut milk, sugar, syrup, eggs or applesauce mix, and spices.  Stir to combine.

Sprinkle the entire box of cake mix on top, followed by the chopped pecans.  Pour the melted butter evenly on top. 

Bake 45-50 minutes until center is set and edges are lightly browned. 

Wednesday, September 11, 2013

Grilled Ratatouille Risotto

It's September... What???? It's September? Uh... my last post was in July... where did August go?

I'll sum up my month of August in 5 words and that'll probably explain why I haven't posted in so long. 

Job * House * Puppy * Vacation * Grill

Yep, we like a challenge.  I got a nice job, we bought a house, got a little puppy Lucy, took a "Vacation" to Minnesota and bought a grill.  I know, a grill probably isn't significant to most of you, but it is to us. We've been grilling every meal since we bought the thing and LOVE it! Not as much as our new puppy though.  Let's talk about her...


 Here is Lucy.  She also goes by Goose, Megusta and Gustavo

 Here is Lucy eating her bone. She's a foodie like her mom and only goes for the best.

 Here is Lucy playing in the garden.  She prefers cherry tomatoes. 


She is the love of our lives.  And time consuming... very time consuming, which is the biggest reason for my lack of posting in the last month.  Pretty unfortunate because we've had some awesome postworthy meals.   Like this one... I was going through our fridge and really wanted ratatouille since it's fall (90 degrees out, but still fall).  Since we grill everything these days, I was going to create grilled ratatouille and since Nick always complains that ratatouille isn't filling enough for a meal, I wanted to add a starch and voila... we got grilled ratatouille risotto.  Um it's pretty much the most amazing thing ever and with grilled focaccia... awesome!!!  This would be an awesome thing to grill on a nice cool fall evening... with a nice glass of Cabernet. YUM!  I would definitely put this in the top 5 most awesomest meals I've created category.  Hope you enjoy!


Grilled Ratatouille Risotto

Ingredients:
For the Risotto:
1 shallot, thinly chopped
3 cloves garlic, minced
1 cup Arborio rice
1/2 cup dry white wine + more for drinking (I actually used red this time, a cab)
4 cups of vegetable broth (here is the homemade recipe)
1 tablespoon butter
1/4 cup freshly grated Parmesan cheese
2 tablespoons olive oil or grapeseed oil
*This is the base to all of my risottos

For the grill:
1 eggplant, chopped into about 2 inch squares
1 zucchini, chopped
1 yellow squash, chopped
1/2 red onion, chopped
10 basil leaves, roughly chopped
1 large tomato, chopped
2 tablespoons of balsamic vinegar
2 tablespoons of olive oil
4 pieces of foccacia bread, optional but very delicious

Directions:
Preheat grill to about 400. 

In a medium sized sauce pot, bring veggie broth to a boil, then turn down to a simmer to keep warm.

In a large saucepan, heat a drizzle of oil over medium high heat and add shallot and garlic.  Stir and cook about 2 minutes.  Add the rice and stir to coat with oil.  Saute until it turns a golden brown, about 2 minutes. Add white wine and stir.  Add 1/2 cup of the broth and stir continuously until it soaks in.  Repeat this step until the rice is plump, but still has a bite.  You don't want it to be mush.  After the broth is all soaked up, add the pad of butter and Parmesan cheese and stir until cheese is melty. Add salt and pepper to taste. 

Meanwhile... In a large mixing bowl, add grilling veggies except for the tomatoes, the basil, the balsamic vinegar and olive oil.  Give everything a quick toss and transfer to a grilling basket.  If you don't have a grilling basket, get one. They are awesome!  You could probably use foil, but you should probably just buy a grilling basket, they are like 10 bucks. 

Transfer grilling basket to the preheated grill and close the lid.  It should take about 15 minutes for everything to be nice and smokey.  Toss every few minutes to make sure everything is evenly cooked/charred. However you like it.  Towards the end, add the tomatoes and cook for another few minutes.  You can toss a piece of bread on the grates for a couple of minutes too to get nice and toasty.  

Enjoy and tell your friends!!


Wednesday, July 24, 2013

Tofu Pesto Sandwiches

I love going to the deli at the local co op in Minnesota because they have the best tofu sandwiches.  Since moving to Cincinnati, we haven't been able to find a delicious tofu sandwich anywhere... so I decided to make my own.  And they were awesome! They were so incredibly filling, I swear we didn't have to eat for a whole week!  The pesto is so delicious and refreshing.  This is definitely a must for vegetarians.  And all you tofu haters... you just don't know what you're missin! Enjoy!


Tofu Pesto Sandwiches
Makes: 4

Ingredients:
1 loaf focaccia bread, (find recipe here)
1 block of tofu, sliced into 4 patties
1 red pepper, sliced & roasted
1/2 onion, sliced & roasted
4 slices fresh mozzarella cheese
2 tablespoons olive oil

Pesto:
1 package fresh basil, about 10 leaves
1/2 cup peas
2 tablespoons Parmesan cheese
2 tablespoons olive oil
1/4 cup vegetable stock

Directions:
Preheat oven to 400 degrees.

Place the sliced tofu on a greased baking sheet and bake at 400 for 25 minutes, flipping halfway through. (I added the red pepper and onion halfway through to roast).  Bake until the tofu is crispy. 

Meanwhile, add the ingredients for the pesto to a food processor or blender and blend until smooth.  

Slice the focaccia bread into 8 rectangles, to fit the tofu. Spread the pesto over one half and drizzle olive oil over other half.  Place cheese on one half and bake the bread in the oven for about 2 minutes, until cheese is melty.  Add tofu, red pepper and onion to the sandwich and place the top on.

Goes great with kale chips!!

Lentil Sloppy Joe's on Pretzel Buns

We bought a house... yay!! 

That means we need to, once again, pack up all of our belongings and move... boo!!

That means, I get the cupboards and fridge as empty as possible, to avoid having to move tons of food. 

As I was digging through the pantry, I found a lonely bag of lentils.  I rarely cook with lentils... in fact... I think I've cooked with lentils once.  I had really really low expectations for this meal.  

I used to eat sloppy joe's on a weekly basis.  Of course, it was a pound of hamburger mixed with canned sloppy joe mix on white bun.  Gross...   I wanted to make a healthier and more adult version of sloppy joes... while getting rid of my lentils.  

These were so super good!  I couldn't believe how great the pretzel bun went with the sloppy joe.  I also am so amazed that these tasted delicious and way way better than the "kid" sloppy joe's that I used to eat.  I will definitely have to buy lentils again and make these.  Plus... it was super super easy! And they were surprisingly filling.  We ate one each and were stuffed!


Lentil Sloppy Joes
Serves: 6

Ingredients:
3 cups of cooked lentils
1 cup brown rice, cooked
1/2 onion, chopped
2 cloves garlic, minced
1 1/4 tsp chili powder
1 tablespoon ground cumin
1/2 tsp salt
3/4 tsp cinnamon
1 tsp cane sugar or honey
1 14 oz can organic tomato sauce
1 tablespoon mustard, (I used Dijon)
1 tablespoon apple cider vinegar
2 tablespoons soy sauce (I used Braggs)
1 tablespoon grapeseed oil
6 Pretzel Buns (recipe below)
sliced pickles, optional

Directions:
In an large saute pan over medium heat add oil, onion and garlic and saute for a couple of minutes.  Add lentils and rice and stir.  Add the rest of remaining ingredients and stir.  Let simmer over medium heat for 5 minutes.  If too thick, add water or vegetable stock to thin.  Scoop lentil mix over buns.

Pretzel Buns
Makes: 6

Ingredients:
1 cup milk
2 tablespoons butter
2 tablespoons brown sugar
1 tablespoon active rise yeast
2 teaspoons sea salt
3 cups all purpose organic flour

Boiling Solution:
3 quarts of water
3/4 cup baking soda

Egg wash:
1 egg, beaten
1 teaspoon water

Directions:
Heat milk and butter until warm (100-110 degrees F).  Combine yeast and brown sugar and add the warm milk/butter mixture in a large mixer bowl.  Stir in 2 cups of flour and salt, mix for 3 minutes.  Gradually add enough of the remaining flour to make a soft dough.  Knead on a floured surface until smooth and elastic, about 8-10 minutes.  Place in greased bowl, cover and let rise for 1 hour, or until doubled in size. 

Preheat oven to 400 degrees F.

Combine boiling solution and bring to a boil in a large sauce pot.  Punch dough down and divide into 6 equal portions and roll into balls.  Boil each ball in the solution for 2 minutes, turning after 1 minute.  Remove balls of dough from pot using a slotted spoon and place on greased baking sheet.

Brush with egg wash and make two slices across the top.  Bake for 15 minutes, then reduce temperature to 350 degrees F and bake an additional 10 minutes, until loaves are evenly browned.  Remove from pan and cool on wire rack. 

Note: The pretzel buns browned really quickly and almost looked burnt on the outside, but were perfectly cooked on the inside.  Next time, I will place on the 3 rack from the top to prevent the tops from getting too brown. 

Strawberry Lime Popsicles

These popsicles are so delicious and refreshing, especially on a hot summer day!  You can make even make adult versions and add rum instead of sparkling water, but I made them kid friendly. :)  Nick raved over these popsicles... probably because the strawberries were so sweet.  Again, you can add as much or little sugar as you want.  Enjoy!

Strawberry Lime Popsicles
Serves: 6


Ingredients: 
1 pint of fresh organic strawberries
zest and juice of 1 lime
1/2 cup sparkling water
1 tablespoon honey or cane sugar (add sweetness to taste)

Directions:
Remove stems from strawberries and add to blender, add the lime zest and juice, sparkling water and honey or sugar to taste.  Blend until smooth, pour into popsicle molds and freeze.  

Saturday, July 13, 2013

Caprese Risotto

Insalata Caprese... is there really any better salad in the world?  It's a very fresh and flavorful salad made with fresh tomatoes, fresh mozzarella cheese and fresh basil. yum. yum. and yum.

As you know, I've been on a risotto kick lately.  Why? Because it's amazing, fancy, and cheap!  Especially if you make your own broth (make your own free broth Here).  I've been making broth so much these days, my crock pot permanently smells like veggie broth. It's amazing.  Anyway, back to the risotto.  I think this is one of the funnest meals to make with your partner.  Whenever we make risotto, Nick and I always break out the wine and Dean Martin and it really takes us back to Italy.  It's quite awesome.  

This risotto may be one of my best yet.  It's so beyond delicious.  When I took the photos for this, I admit, I was kind of sloppy cause I didn't really know how it would taste... After first bite, I almost went back to take more photos... but I didn't... cause it was too good to put down.  Nick had to work late last night so he heat his up when he got home and still said that it was the best risotto he's ever had!  I really can't wait to make this again... it's so wonderful and fresh for the summer. Enjoy!


Caprese Risotto
Serves: 4

Ingredients:
1 shallot, thinly chopped
3 cloves garlic, minced
1 cup Arborio rice
1/2 cup dry white wine + more for drinking (I used Pinot Grigio)
4 cups of vegetable broth (here is the homemade recipe)
1 tablespoon butter
1/4 cup freshly grated Parmesan cheese
1/2 cup fresh mozzarella cheese, cut into 1/2 inch cubes
1 pint cherry tomatoes, sliced in half
1 small package of fresh basil (about 20 leaves), thinly sliced
olive or grapeseed oil for pan
salt and pepper to taste

Directions:
In a medium sized sauce pot, bring veggie broth to a boil, then turn down to a simmer to keep warm.

In a large saucepan, heat a drizzle of oil over medium high heat and add shallot and garlic.  Stir and cook about 2 minutes.  Add the rice and stir to coat with oil.  Saute until it turns a golden brown, about 2 minutes. Add white wine and stir.  Add 1/2 cup of the broth and stir continuously until it soaks in.  Repeat this step until the rice is plump, but still has a bite.  You don't want it to be mush.  After the broth is all soaked up, add the pad of butter and Parmesan cheese and stir until cheese is melty. Add salt and pepper to taste. 

Remove from heat and add the mozzarella cheese, tomatoes and lastly fresh basil.  Serve immediately. 


Thursday, July 11, 2013

Cantaloupe Popsicles

So if you know me, you know I have a homemade Popsicle obsession.  I love them and I think they are the greatest things ever to make with your kids.  I loved loved loved making homemade Popsicle when I was a kid... of course, mine weren't as healthy as the ones I make now.  I'd basically pour a can of root beer in a Popsicle mold or a glass of high sugar fruit juice.  Now, I love making them with fresh fruit because they taste better and have a way better texture.  


I ordered a new Popsicle mold on Amazon last week and it arrived in the mail this week.  I swear I almost jumped into the delivery guy's arms I was so excited.  If only they knew what was inside that smiley faced box.  I've only made one batch of Popsicle with these molds, but wow are they awesome! And HUGE! Nick and I couldn't finish our whole Popsicle  we had to save the rest for later.  Awesome!!  

Nick thought these Popsicle needed more sugar, but I think they were awesome.  Of course you can taste the puree and add sugar/honey to your liking. I was actually worried that this wouldn't work without adding some sort of liquid, but wow, cantaloupe has a ton of water in it.  They blended so easily and turned out delicious!  Super healthy snack when you need something cool on these hot hot days. 


Cantaloupe Popsicle
Serves: 6

Ingredients:
1/2 cantaloupe, pealed seeded and cut into cubes
1 tablespoon organic raw honey (more or less to your liking)

Directions:
In a large blender, puree cantaloupe and honey until soft about 10 seconds. Pour into Popsicle molds and freeze.  What a refreshing easy treat!


Monday, July 8, 2013

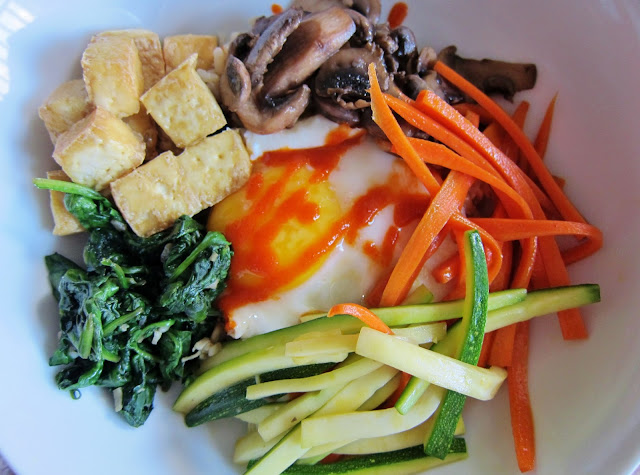
Bibimbap

I absolutely love all Asian food.  Though I have to admit, I wasn't that fond of Korean cuisine, until recently.  Who knew that Cincinnati, OH would have a fabulous Korean restaurant... better than anything we ate in Hawaii.  Yes, I'm shocked.  We also have a friend here form Korea and he got me to like Kimchi.  Again... shocker. 

For Nick's birthday, we went to this Korean restaurant.  Holy moly... it was delicious!  We got sushi, but it was different than Japanese sushi... amazing.  Then we got a whole bunch of things and I have no idea what they were, but they were all delicious.  We kept staring at everyone's dishes around us and it all looked amazing.  I can't wait to go back!

One really popular dish in Korea (well it's popular here in America/Cincinnati) is Bibimbap.  Super delicious and veritable.  Nick had it for the first time a while ago.  I've never actually had it from a restaurant, but I know the flavors in mine were outstanding.  Who knew that a little veggies and rice could pack so much flavor.  I love it! Makes me want to travel again. I highly recommend googling bibimbap to see what other awesome ingredients you can put in this dish. Enjoy!


Bibimbap
Serves: 4

1 cup brown rice
1 bunch of fresh spinach, rinsed
1 garlic clove minced
2 carrots, cut into matchsticks
1 zucchini, cut into matchsticks
1 package mushrooms, sliced (calls for shiitake, but I used baby bella)
1/2 block of tofu, baked (see how to perfectly bake tofu, here)
4 tablespoons Gochujang, (It's a Korean chili sauce... I just used Sriracha)
1 tablespoons sesame oil
2 tablespoons soy sauce, I used Bragg's
1 tablespoon honey
1 teaspoon brown sugar
4 eggs

Directions:
Cook brown rice according to package instructions.

Meanwhile in a large saute pan over medium high heat, add mushrooms, 1 tablespoon of sesame oil and a teaspoon of brown sugar.  Cook until mushrooms have released their liquid.  Set mushrooms aside and cover with foil to keep warm.

Add carrots to saucepan with 1 tablespoon of soy sauce and honey.  Saute until cooked, but still crisp, about 3 minutes. Set aside with the mushrooms and cover with foil. 

Add zucchini to the saucepan and saute for about 2 minutes.  Remove and set aside with the mushrooms and carrots, cover with foil. 

Add spinach and garlic to the saucepan with 1 tablespoon of soy sauce.  Saute until spinach is wilted. Set aside with other ingredients. 

In the same saucepan, fry up eggs, sunny side up. 

In a large bowl, add rice and top with fried egg.  Drizzle chili sauce over the top and arrange the vegetables and tofu around the egg.  Enjoy!

Raw Pasta with an Avocado Pea Pesto

Raw pasta... what?  This is my first time making zucchini noodles.  I've always thought that they can not be as filling as wheat or rice noodles and I can't stand when I'm hungry about an hour after dinner.  I was pleasantly surprised with how filling this meal was!  Yet again... this is a wonderful meal for a hot summer day.  It is really meant to be made raw, but for some reason, I really need my dinners to be warm.  Unless it's a sandwich. I basically put everything together like the recipe said and then just sauteed it in a pan for literally 2 minutes.  Just to warm it up.  But if you don't feel like heating the stove and if you're not a freak for warm food like me, you can totally eat this raw.  This was really good, super fast to make and filling too! I served it with my homemade Focaccia Bread, which is not gluten free, but you really don't even need bread to do with it because it is very filling itself.  Enjoy!


Raw Pasta with an Avocado Pea Pesto
Serves: 4

Ingredients: 
2 large zuchini
1 avocado, peeled and pit removed
1 bunch basil
1 small bunch mint leaves, about 10 leaves
1 clove garlic
1/2 cup frozen peas
1/4 cup cold pressed olive oil
1 cup cherry tomatoes, halved
juice of one lemon
salt and pepper

Directions:
To make the zucchini noodles, I used a vegetable peeler and peeled of strips, then I cut the strips in to small noodles, similar to the size of linguine.  Set aside when complete.

In a large food processor or blender, add the avocado, basil, mint, frozen peas, olive oil and lemon juice.  Blend until smooth and creamy.  

In a large mixing bowl, combine the zucchini noodles and pesto.  Add the cherry tomatoes and give it a gentle stir.  Salt and pepper to taste. 


Tuesday, July 2, 2013

Black Bean and Sweet Potato Quesadillas on Homemade Tortillas

For the past year, I have been making all of my bread products from scratch using organic flour, with the exception of flour tortillas. Why? ... Because I was intimidated to make my own.  Well, Whole Foods is out of organic tortillas far too often so I decided to give it a shot and make my own.  They weren't the most beautiful tortillas (according to Nick), but wow, did they taste amazing!! There are no added preservatives or unwanted ingredients when you make your own baked goods and seriously, it is so easy! I know that you can substitute gluten free flour or corn flour and they would taste just as amazing.  They actually looked a lot like some gluten free pancakes we made a few months back.  The best part about these are, you can make them on a rainy boring day and freeze them for later use.  Very delicious!

My new favorite vegetarian/Mexican ingredients are black beans with sweet potatoes.  They just go well together and are very filling.  These quesadillas were so delicious and ridiculously easy. Enjoy!


Black Bean and Sweet Potato Quesadillas
Serves: 3

Ingredients:
1 cup cooked black beans
1 large sweet potato
1 cup fresh spinach
1 avocado, sliced
1 cup cheese, whatever kind you like... I used raw white cheddar
Greek yogurt and salsa to taste
6 tortillas (recipe below)

Directions:
Preheat oven to 400 degrees and slice sweet potato into thicker slices.  Place on a baking sheet with olive oil and bake for 10-15 minutes, until soft. 

Place a tortilla on a plate and add black beans, roasted sweet potato, spinach, and avocado, top with cheese and remaining tortilla.  The amount depends on how full you want your quesadilla.  Transfer to a saute pan over medium high heat with a little spray.  After 2-3 minutes, flip and cook other side for 2-3 minutes.  Transfer to plate and serve with Greek yogurt and salsa. 

Flour Tortillas
Makes 6 tortillas

Ingredients:
1 cup all purpose organic flour, plus more for dusting
1 tsp sea salt
1/2 tsp. cumin
1/2 tsp. cayenne pepper
2 tablespoons grapeseed oil
1/2 cup water

Directions:
In a larger mixing bowl, sift together the flour, sea salt, cumin and cayenne pepper.  Add oil and water and mix with a wooden spoon until combined.  Roll out onto a lightly floured surface and kneed for about 2-3 minutes.  Roll into 6 small balls and let sit for 10 minutes.  

If you have a tortilla press, which I don't know anyone who has a tortilla press, but if you do, press out the dough on your press to form tortillas.  If you're like me, you can lay out a piece of saran wrap and spray it with oil, then place your ball of dough in the center.  Top with another piece of oiled saran wrap and press down firmly using a heavy pan.  I actually placed the wrap on the floor and stepped in the pan to press into nice thin tortillas.  Now that I think about it... I don't think I washed the pan afterwards... oops.  

In a large cast iron skillet over medium heat, add the tortilla and cook for about 2 minutes per side.  Remove from pan and let cool.  Enjoy!

Thursday, June 27, 2013

Sweet Corn Risotto

My favorite summer vegetable as a kid was always corn on the cob.  But the corn on the cob that you get from the farmers stand, not the store.  There is a big difference.  

I wanted to make something different with the corn on the cob and since I've been on this risotto kick lately, I thought I'd make sweet corn risotto... and boy was it delicious!  I cooked the risotto and made white wine chicken and roasted asparagus to go with it.  What a perfect comfort meal!  With a glass of white wine, this meal is amazing!  Also, if you want to make your usual meat, veggie, starch meal look fancy, just stack it instead of plating it side by side.  Trust me, people will automatically think you put way more effort into the meal if you stack it.  It looks that much better.  Enjoy!


Sweet Corn Risotto
Serves: 6

Ingredients:
1 cup arborio rice
1 onion, chopped
3 cloves of garlic, minced
3 ears of corn
1/2 cup white wine
4 cups vegetable broth (make your own veggie broth here)
1 tablespoon butter
1/4 cup freshly grated Parmesan cheese
olive oil
salt and pepper 

Directions:
In a large sauce pot, heat vegetable broth over medium heat until hot.  Reduce to simmer.

Meanwhile, in a large saute pan over medium heat, drizzle about a tablespoon of olive oil and add the onion. Saute for a few minutes until onion is translucent.  Add the garlic and arborio rice.  Saute for another few minutes until the rice becomes a golden brown.  Add the white wine and stir.  Remove the corn from the cob with a knife and add the corn to the rice mixture and stir.  Add 1/2 of the broth and stir continuously until the broth is absorbed.  Repeat this step until all of the broth is used or until the risotto is a creamy texture.  Add butter and freshly grated Parmesan and stir until combined.  Salt and pepper to taste. 


I served this with chicken thighs (only because they were on sale, breasts would be fine too) but I normally brown my chicken in a cast iron skillet with some oil (and added rosemary sprigs), then add a nice sized splash of white wine and transfer to a 350 degree oven for about 15 minutes or until chicken is done. Comes out nice and juicy.  I also roasted some asparagus drizzled with grapeseed oil at 350 for about 10 minutes.  Enjoy!