Saturday, April 13, 2013

Wild Rice and Berry Salad

I hate eating salads for dinner because I’m always hungry about an hour later and then I break out the chocolate, which totally defeats the purpose of eating a salad.  However, this salad was amazing, very healthy and filling.  It’s the perfect detox after a weekend of indulgence.   I call it the Minnesota salad because it just reminds me of Minnesota.  It’s delicious! 


Wild Rice and Berry Salad
Serves: 4

Ingredients:
2 cups of spring salad mix
1 cup of spinach
¼ cup raw sunflower seeds, lightly toasted
¼ cup raw pepitas, lightly toasted
¼ cup raw slivered almonds, lightly toasted
1 cup wild rice, cooked
½ cup Strawberries
½ cup Blueberries
1 avocado (optional)

Dressing:
¼ cup of good olive oil
Juice and zest of ½ orange
Juice and zest of ½ lemon
1 Tbs white wine vinegar
Salt and pepper to taste.

Place salad and spinach on a plate and top with berries, nuts and warm wild rice.  Serve with citrus dressing.

Saturday, April 6, 2013

Homemade Cheese Ravioli

I just love cooking with my husband with a nice glass of wine and some nice tunes (tonight was Dean Martin... very fitting for a nice Italian meal).  This meal took a while to cook, but it's so nice taking our time and enjoying the moment.  When we finally sat down to dinner, it was amazing!! Definitely worth the wait.  And the best part is (if you don't have time to cook during the week) you can easily make this ahead of time and freeze the raviolis until you are ready to cook it!  So worth it!


Homemade Cheese Ravioli with a Fresh Mushroom Sauce
Serves: 6

Ingredients:
Pasta:
2 cups organic all purpose flour, plus more for dusting
1 tsp Himalayan sea salt
3 large eggs
2 Tbs olive oil
1/4 cup water for sealing

Filling:


1/2 cup part-skim ricotta (I actually used cottage cheese and just smashed the curds into a smooth spread)


1/2 cup shredded mozzarella

1/2 cup shredded Parmesan
1 clove garlic, finely minced
1/4 tsp. dried oregano
1/4 tsp. dried basil
1/4 tsp. dried parsley (I used fresh)
1/4 tsp. salt
pinch ground black pepper


Sauce:


1 package fresh baby bella mushrooms, or mushroom of your choice

2 tablespoons cooking oil of choice, I used grapeseed
1 large shallot, finely chopped
2 garlic cloves, minced
1/2 cup dry Marsala (I used Chardonnay, cause it's what I had)
2 cups low-sodium veggie broth, (I used homemade... yum)
1 tablespoon unsalted butter, at room temperature
1 tablespoon all-purpose flour
chopped fresh parsley, to garnish


Directions:

Pasta Dough:
In an electric mixer fitted with dough hook, combine the flour and salt.  Add the eggs one at a time, and continue to mix.  Drizzle 1 tbs of olive oil and continue to incorporate all the flour until it forms a ball.  Sprinkle flour on a work surface, knead and fold the dough until elastic and smooth (about 10 minutes).  Brush the surface with remaining oil and wrap in plastic wrap.  Let rest for about 30 minutes to allow the gluten to relax. 

Cut the ball of dough in half, cover and reserve the piece you are not immediately using to prevent it from drying out.  Dust the counter with a little flour and press the dough into a rectangle.  Roll it through a pasta machine (or with a rolling pin) until about 1/8 inch thick.  If using a rolling pin, you will not have to work out the rest of the month and you will be sore the next day (from experience).  It'll take about 15 minutes of constant rolling to get it thin enough.  

Dust the counter and sheet of dough with flour, lay out the long sheet of pasta and brush the top of the surface with water, which will act as glue.  Drop, by the tablespoon your favorite filling (below) on 1/2 of the pasta, about 2 inches apart.  Fold the other 1/2 over the filling like a blanket.  Gently press air out of the pockets around each mound of filling.  Use a sharp knife or pastry cutter to cute each pillow into squares and crimp the 4 edges with your fingers or a fork to create a tight seal.  Set aside and create another batch with second half of dough. 

Cook the ravioli in plenty of boiling salted water for 4 minutes or until they float to the top.  Be careful not to overcrowd the pot.  Lift the ravioli from the water with a large strainer or slotted spoon and set aside.  Pour sauce over top of the ravioli and serve. 

Filling:
Stir all four cheeses, the garlic, and the herbs and seasonings together in a medium bowl. Done and Done!

Sauce:
Heat cooking oil in a skillet over medium heat, add the shallot and garlic and cook until tender.  Add the mushrooms and cook until they've released their juices, about 5 minutes.  Add the wine and cook for about another 5 minutes.  Add the butter and flour and make a roux, whisk in the veggie broth and stir over medium high heat.  Lower the heat and stir until thickened. Add parsley at the end for garnish. 

Homemade Baked Falafel

I love getting falafel at Mediterranean restaurants because it's so delicious and it's something I would never make at home... until now.  Last time I got falafel at a restaurant, it was just okay... I will not pay $10 for just okay.  So the next time I craved it, I decided to make it myself... and much healthier!  I made this from scratch, baked it, not fried, and it was delicious! I was so surprised at how well these turned out.  I love the skillet idea because they still get very crispy.  I hear that using dried chickpeas and soaking them makes for a crispier falafel than if you were to use canned chickpeas.  I can't wait to make these again. You can also make ahead of time and freeze them, then just pop them in the oven when you're ready to eat!  YUM!


Baked Falafel
Serves: 6

Ingredients:
1 3/4 cup dried chickpeas
2 cloves garlic, lightly crushed
1 small onion, quartered
1 tsp ground coriander
1 tsp cayenne pepper, or to taste
1 tsp salt
1/2 tsp black pepper
1/2 tsp baking soda
1/2 tsp lemon juice

2 tbs grapeseed oil

Serve with, pita bread, red onion, romaine lettuce, cucumber or other desired veggies.  

Yogurt Sauce:
Mix together 1 cup greek yogurt, 1 tsp lemon juice, 2 tsp dried dill, 1 minced garlic clove and 1 tbs olive oil, 

Directions:
For the falafel, put the beans in a large bowl and cover with water by 3 or 4 inches; they will triple in volume.  Soak for 24 hours, adding water if needed to keep beans submerged.  Drain the beans well (reserve a little soaking water) and transfer to a food processor.  Add the remaining ingredients except the oil; pulse until minced but not pureed, scraping the sides of the bowl.  If necessary add 1 or 2 tablespoons of the soaking water until the mixture comes together.  (Try to keep the addition of water to a minimum, as too much will make the batter fall apart when it hits the oil).  Taste the mixture and adjust for salt, pepper, cayenne, and lemon juice. 

Preheat a large cast iron skillet in a 350 degree oven.  Drizzle grapeseed oil in the bottom of the skillet.  Take a heaping tablespoon of falafel mix and shape into a ball, then flatten into patty.  Place patty into bottom of oiled skillet.  Repeat for all the falafel mix.  Place skillet in oven for 20 minutes, flipping halfway through. 

Enjoy!

Friday, March 29, 2013

Black Bean Brownies with an Avocado Icing


I've been on this gluten free dessert kick lately.  I don't know why... maybe because I like a challenge.   I saw a black bean brownie recipe with no gluten, just black beans and had to try it.  I wanted to come up with a fun way to frost these bad boys and what goes great with black beans??? Avocado!! Yeah!  Just need tortilla chips!

These were actually pretty good!  They aren't too sweet and you don't feel nasty after eating one or two... or a whole pan.  Enjoy!!


Black Bean Brownies
Serves: 16

Ingredients:
1 can organic black beans, drained and rinsed (or you can soak, cook and rinse 1 1/2 cup dry beans)
3 large organic eggs
3 Tbsp grapeseed oil (I used 2 and 1 Tbsp coconut oil)
3/4 cup organic cane sugar (I used 1/2 and then a few tablespoons of honey)
1/4 cup unsweetened cocoa powder
1 tsp baking powder
Cooking spray for pan (again, I just used coconut oil)

Directions:
Preheat oven to 350 degrees.  Lightly grease a 9x9 pan with coconut oil or spray.  Place all ingredients in a blender and blend until smooth.  Pour mixture into greased pan and bake for 25-30 minutes.

Avocado Icing

Ingredients:
1 avocado
3-5 Tbsp raw honey (you can adjust to taste)
1/4 cup cocoa powder
2 tsp vanilla
1 tsp cinnamon
pinch of salt

Directions: 
Mix all ingredients in a food processor until mixed, spread over cooled brownies.  (I did have chunks of green in my icing because I didn't mix it well enough... It's okay, it adds character.  


Sunday, March 3, 2013

Make your own bean sprouts!

If you get grossed out by store bought sprouts, fear no more... just make your own!

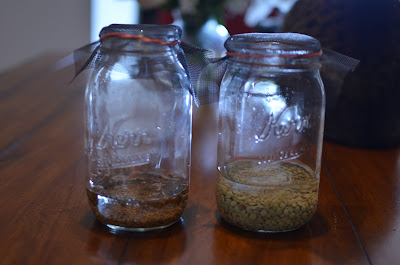
A lady from my work sprouts her own beans and seeds and snacks on them.  She knows I have an interest in food and growing my own things so she set me up to make my own bean sprouts.  They are quite easy.  All you need is a large mason jar, a square of screening (or cheesecloth), a rubber band, and beans or seeds of your choice!

To start off, I made alfalfa sprouts and lentil sprouts.  They are both great on salads and sandwiches.  Or just as snacks!

Here is what you'll need:


1 jar (per seed or bean or whatever you're sprouting), 1 piece of screening or cheesecloth to cover the jar, 1 rubber band, about 1/2 cup seeds or beans (I actually only used about 1/4 cup of alfalfa seeds, but I used 1/2 cup green lentils)


Place the beans in the jar, cover with screening and secure with rubber band.  Pour cool water over the beans until it reaches a couple of inches over the top.  Soak in a cool and dry place for 8 hours.  (I started in the morning and soaked all day).


After 8 hours, rinse beans and drain on a towel.  Keep on towel or drying rack over night.  Rinse and drain twice a day for about 4 days.  I usually rinse and drain before work and after dinner.


It's easy to just let it hang out in the drying rack all day.  The above picture was taken day 2 of the process, you can kind of see them sprouting a bit.  They expand a lot!


This picture was taken at day 3.  They are ready to eat now, but have only sprouted a little.  They still taste delicious!


Here they are all finished!  We actually went on vacation so this is as far as I got them to sprout, but they were still good 4 days later after sitting in the fridge.  Enjoy!!

Organic Chocolate Chip, Peanut Butter, Oatmeal Cookies!

These cookies are so delicious and gluten free! I love cooking with oats instead of flour because for some reason, it feels healthier... and then I eat more.  I could eat these cookies for breakfast.  I do want to mention though that if you are making these truly gluten free, then you have to make sure to read your oat packages.  Most oats contain traces of gluten so make sure they say "organic" and "gluten free."  Somewhere on the package, it'll let you know that they are truly gluten free.

Anyway, our grocery store started selling organic chocolate chips and they are sooooo delicious! I think I ate a cup of straight up chocolate chips before I even added any to the cookies.  Organic ingredients just have more care put into them and are just higher quality ingredients all together.  They are like how all ingredients should be.   Using organic ingredients will just make everything you make tastier! Enjoy!


Organic Chocolate Chip, Peanut Butter & Oatmeal Cookies
Makes: 24 cookies

Ingredients:

1 stick of organic butter, softened
1/2 cup organic brown sugar
1/2 cup organic white sugar 
1 organic egg
1/4 tsp. real vanilla
1 tsp organic baking soda
3/4 cup organic creamy peanut butter
2 1/4 cup organic oats (make sure they are gluten free)
1 1/2 cup organic semi-sweet chocolate chips

Directions:

Preheat oven to 350 degrees.

Cream butter and sugars.  Add egg, vanilla, baking soda, and peanut butter.  Mix well until smooth.  Add oats and mix well, scraping side of bowl.  Add chocolate chips and mix until combined. 

Drop batter by rounded tablespoonful onto ungreased cookie sheet.  (I used parchment paper, easy clean up!)

Bake until cookies are golden brown, about 9 minutes. Let cool on cooling racks... if they make it that far.  

Zucchini and Goat Cheese Enchiladas

You know what's awesome?  Getting 11 ounces of goat cheese from the grocery store for $3.00 because it's "close to the expiration date" (the expiration date was March 29, I think we're okay)!  Since we had such a huge amount of goat cheese, I had to some up with some recipes to use it up, which isn't too hard because goat cheese is awesome. 

Anyway, we also have a plethora of white corn tortillas so I decided that enchiladas were in store.  These were so delicious!  It really pays to make your own enchilada sauce. Canned enchilada sauce shouldn't even exist when it's so simple to make your own AND you can make it ahead of time and either stick it in the freezer or can it yourself.  So easy!


I do have to say though... I highly recommend the white corn tortillas from Trader Joe's.  They are way delicious and so much better than the cheap corn tortillas that you get from the grocery store.  We're going to try Whole Foods brand next and see how they turn out.  


Anyway here is the recipe! P.S. I put absolutely no effort into this photo because they smelled so good and we were so hungry.... I snapped the photo and devoured the enchiladas. Enjoy!


Zucchini and Goat Cheese Enchiladas
Serves: 6

Ingredients:
Enchiladas:
3 large zucchini, cut into 1/4 inch dice
1 small onion, coarsely chopped
1 Tbs olive oil
zest and juice from 1 lemon
salt to taste
1 cup cooked black beans (if you don't feel like rinsing and cooking beans, you can use 1 can, rinsed and drained)
6 oz goat cheese, divided
12 white corn tortillas

1/2 cup cilantro, chopped
4 lime wedges

Sauce:
1 tsp oil
1/2 small onion, finely chopped
4 cloves garlic, minced
1 1/2 Tbs chili powder
1 tsp chipotle chili powder, optional
1/2 Tbs ground cumin
1 tsp sugar
1/2 cup veggie brother (or water)
1 (8-oz) can tomato sauce
salt and pepper to taste

Directions:
Preheat oven to 400 degrees.  On a large rimmed baking sheet, combine the zucchini, onion, oil, lemon zest & juice, and salt; toss to coat. Roast, stirring occasionally, until the zucchini is softened, about 30 minutes. Transfer to a large bowl; stir in the black beans and 5 ounces of goat cheese.


Meanwhile , heat 1 tsp. oil in a medium saucepan over medium heat. Add the onion and cook until translucent and slightly browned around the edges, stirring occasionally, about 8 minutes. Add the garlic, chili powder, cumin, and sugar; cook, stirring constantly, until fragrant, about 1 minute. Add the water and tomato sauce. Increase the heat to medium-high, bring to a simmer, then reduce the heat to medium-low. Maintain a low simmer until slightly thickened, 5 to 10 minutes, stirring occasionally.
Reduce the oven temperature to 350 F.
To soften the tortillas, spray them with a light layer of oil. Arrange 6 tortillas in a single layer on a baking sheet; transfer to the oven and cook for about 3 minutes; flip the tortillas and continue baking for 2 more minutes, until the tortillas are pliable. Repeat with the remaining tortillas.
Spread a thin layer of sauce over the bottom of a 9-by-13-inch baking dish. Divide the filling evenly between the 12 tortillas. Roll the tortillas over the filling, arranging the filled tortillas seam-side down in the baking dish. Cover the rolled tortillas with the remaining enchilada sauce. Sprinkle the remaining 1 ounce of goat cheese over the top of the sauce.
Bake uncovered for 25-30 minutes, until the enchiladas are evenly heated. Let set for 2-3 minutes before serving with cilantro and lime.